v10.0 - Last Mod.: 09/13/2018
In this section you can define the settings of your network, view user feedback and monitor content and comments.
1. Community Control
- Click the button Portal Manager to get to the administrative area.
Then click Network & Community > Monitoring and Settings.

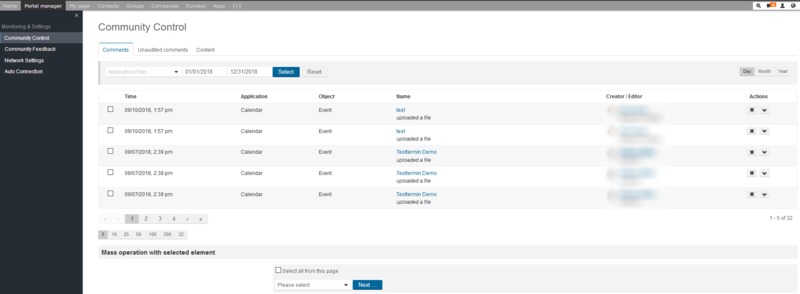
Tab Comments
Here you can see content from your portal in different applications.
- You can restrict the content displayed with the application filter or the date filter and click on the name or Actions -> Open to view the content.
- To delete a content, you can select the bulk operation "Delete" or click Actions -> x / Delete on the respective element.
Tab Unaudited Comments
Unchecked guest comments will be displayed here.
- The displayed comments can be restricted with the application filter and opened by clicking on the name.
- To approve a comment, you can choose the bulk operation "Approve" or, for the respective element, click Actions -> Approve.
- To delete a comment, you can choose the bulk operation "Delete" or, for the respective element, click Actions -> x / Delete.
Tab Content
Here you can see all contents in the different applications of your portal .
- You can restrict the content displayed with the application filter or the date filter and click on the name or Actions -> Open to view the content.
- To edit an element, click on Actions -> Edit.
- To delete a content, you can click Actions -> x / Delete on the respective element.
2. Community Feedback
- Click the button Portal Manager to get to the administrative area.
- Click Network & Community > Monitoring and Settings.
- In the navigation on the left click Community Feedback.

Guests and users of your portal, can send feedback on different content such as companies, blogs, forums, users, etc. These reports are gathered here and can be further reviewed by you.
- You can filter the received feedback according to status types, report type and / or applications as well as restricting the display via the time range selection.
- You can open the reported content by clicking on the name or by selecting "View" or "View Original" under Actions.
- To delete a report you can choose the bulk operation "Delete" or, for the respective element, click Actions -> x / Delete.
- To change the status of a report you can choose the bulk operation "Status - Update" or, for the respective element, click Actions -> Toggle Status.
Top
3. Network Settings
- Click the button Portal Manager to get to the administrative area.
Then click Network & Community > Monitoring and Settings.
- In the navigation on the left click Network Settings
General
- In the section Profiles activate the checkboxes according to how you want to set up your network:
- Show tabs inside profiles, e.g. Blogs, Files. Note: If checkbox is disabled, only contacts can see tabs
- Show profile images in blog boxes
- Show user name instead of full name
- Enable privacy options for user relationships and their profiles
- Maximum number of contact request per day and per user. - set the number here
Guest comments
- Activate the checkbox Check guest comments before posting if guest comments have to be checked and released in the Community Control.
Note: In order for guests to be able to comment, the permission "comment_create" has to be assigned to the user role "Everybody".
Top
3.1 Help texts for forms
Here you can set up help texts, which are grey in the forms, to assist the users when filling the forms.
- Click the tab Help text for forms.
- Enter the texts in the single fields.
- Click the Save button when ready.
By clicking the flags under "Switch language selection to:" at the bottom of the page, you can setup help text for further languages.
Top
4. Auto Connection
Auto connections are connections between users, who are added here, and new created/registered users.
- Click the button Portal Manager to get to the administrative area.
- Then click Network & Community > Monitoring and Settings.
- In the navigation on the left click Auto Connection.
You get to the overview of all users who get auto connections.
Top
4.1 Overview
All users who get auto connections are listed here:
- Image Shows the profile image of the user.
- Name/Company Shows name and company of the user.
- Edit By clicking the icon you get to the editing mode.
- Delete By clicking the icon you delete the user from auto connections.
Top
4.2 Add
- Click on the +Add button.
- Enter in the field Add User a part of the name of the user, which should be added here.
- Click the profile of the desired person from the list.
- Activate in the area Privacy the checkboxes of the data which should be visible for the new contacts.
- Click the button Save when ready.
Top

